Showing posts with label Bedroom. Show all posts

Friday, August 22, 2014

Bedroom Reveal

My bedroom has been finished for sometime now, but with the summer here, I couldn't get motivated to sit and write blog posts!  My bathroom is also complete, along with my tiny hallway and a DIY project, so those will also be coming up in the next little while.  I will also be updating my house tour page, so stay tuned!

Here are some before shots of my bedroom after I'd moved in.


Here is how it looks now after some paint, 2 IKEA hacks, some new accessories, and some DIY projects!


My favourite thing is the nightstand that was made from an IKEA Rast dresser.  It provides more storage and more space on top than my previous one!


I created the 4 photos in the black square frames in Photoshop.  They are all either places or memories that are important to me.  I couldn't find square frames ANYWHERE.  My mom ended up finding them in JoAnn's in Arizona when she was there and hauled them back here for me!  The other colourful, flower photos I've had since university but never had any where to display them.  I picked up some black Nyttja frames from IKEA and finally put them on display on the sliver of wall between my closet and the door.


I've always loved the look of a juju hat, but for the price they go for, it was never going to happen!  The juju above the bed was one of my very first DIY projects on this blog.  The feathers blow lightly in the wind when the window is open and add a soft texture to the room.


The corner shelf unit was the first IKEA hack I had ever attempted.  It fills the weird corner space perfectly and allows me to display my giraffe collection, and houses my tv.


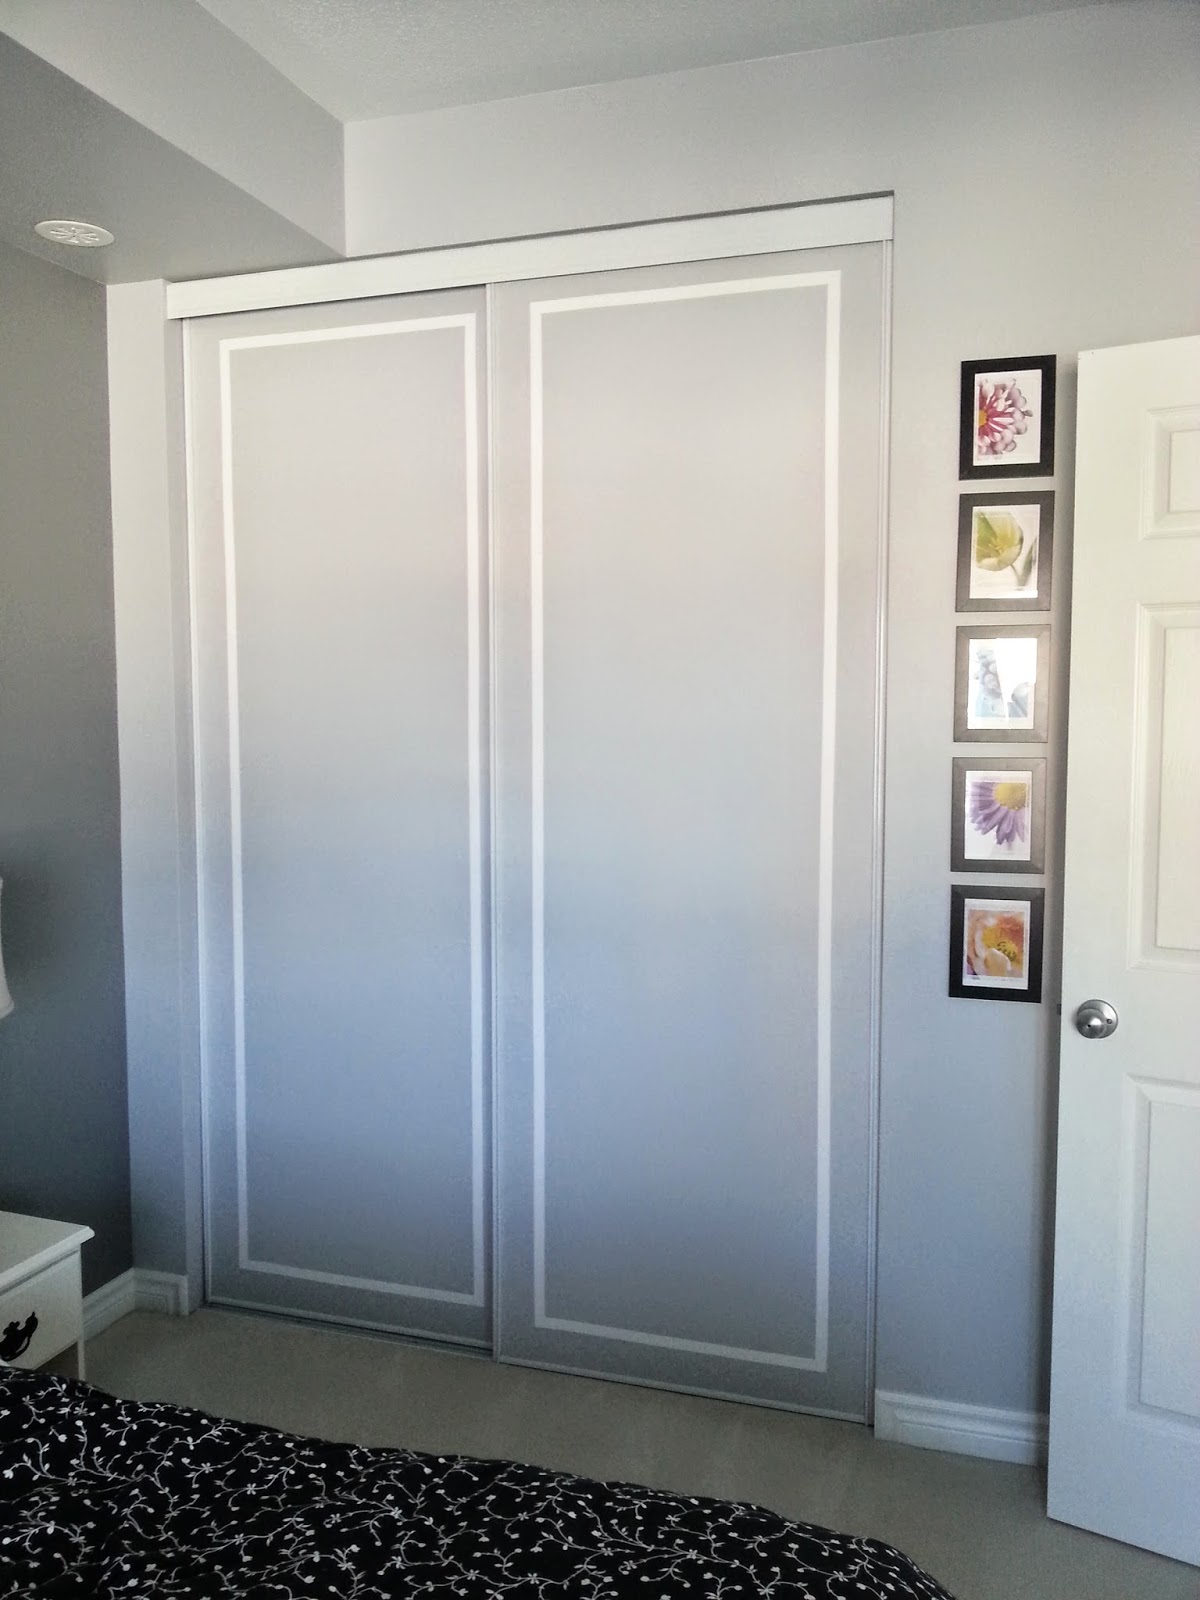
I also updated my closet doors with some tape and paint.  Honestly, I can't even remember what they looked like before!


Here is a resource list for the room (if you see something not listed and you're interested, just let me know!):

Walls:
Paint: Fine Silver (Dulux Paint colour matched to Behr) and Anonymous (Behr)

Light Fixtures:
Nightstand: Winners
Dresser: Base: unknown (had it forever!), Shade: Bouclair

Bed:
Duvet: IKEA (I think it's discontinued now though)
Headboard: DIY from an old door with added crown moulding
Wool Pillow: IKEA (also discontinued)
Juju Hat: DIY
Wooden Wall Accessories: Third World Bazaar

Reading Corner:
Chair: Kijiji (it's an IKEA Poang, however the cover is discontinued)
Frames: JoAnn Fabrics

Window:
Curtains: Home Outfitters
Pull-Down Blind: Levelor from Lowe's

Storage:
Dresser: Mine from childhood
Corner Shelf: Ikea hack from Lack tables
Nightstand: Ikea hack from Rast chest

It's so nice being able to go to sleep in a room that is relaxing and clean each and every night!

Want to read about the bedroom reveal from the beginning?  Here is a list of all the published posts along the way!


Monday, May 19, 2014

Ikea Hack: Quilted Rast Dresser

My last Ikea Hack was so popular, that I wanted to try another one!  (You can read about my Lack Corner Shelf Hack here.)

I wanted a new nightstand for my bedroom that was a little bit bigger and provided some more storage.  The one I was currently using I'd had since I was a child and it was getting pretty squishy.  I only had room for a lamp, my clock, and a phone.  Anything else, like books I was reading, had to go on the floor.  I immediately thought of the Rast dresser from Ikea.  It's cheap and easy to customize.  I did some Pinterest searching, and came up with lots of ideas.  I loved the idea of covering it in a faux ostrich fabric like I'd found at Simple Details, but I also liked the idea of trimming out the bottom to make it look more expensive, like The Accent Piece had done.

I purchased the Rast over March Break.  I had every intention of making this my March Break project...that totally never happened considering I only just finished it!


Here is what my bedroom looked like before, and what the Rast dresser looked like before:


I'd say it was a pretty significant transformation!  Here's how the whole process went down.

I purchased the Rast model for $39.  It was super simple to build - took probably 20 minutes.


When you build the dresser, the piece of wood that runs along the bottom does not sit flush with the front of the two side pieces (you can see what I mean in the before picture above.)  My dad helped me out, and we drilled new holes above the pre-existing ones so the front would sit flush when assembled.  This ensures that you have no gap when you install the moulding.


Next, we measured and cut the moulding to go along the bottom.  (I will leave out the gory details we encountered in this step...in true DIY fashion there may have been a lot of arguing.  We even contemplated not doing the moulding anymore.  The moulding I picked was too large for our miter saw and couldn't be cut properly.  Lessons learned: measure how how high your saw can cut before purchasing wood, and don't start this step at 10:30 at night...)  We were going to nail the moulding to the bottom, but, of course, the nails were not cooperating, so we just decided to glue and clamp.  The glue worked, I recommend that!  We also measured and drilled for the new handles.  I didn't bother filling in the old holes as they were going to be covered by fabric later anyway.


I let the glue dry overnight, and the next morning I had some serious filling and sanding to do!  (I told you the cutting was pretty bad!)


I had two test pots of paint mixed at Home Depot for about $5 each.  One was colour matched to the fabric I chose, and the second one was just plain black.  I primed everything first.  Then I painted the edges of the frame black as well as the moulding along the bottom.  (Once it was painted, you couldn't even tell the moulding had been so crazy! yay!)  I painted the edges of the drawers, as well as along the inside of the frame, the fabric colour.  This ensures that when the drawers are closed, you don't see any of the original pine. Everything received 2 coats.


The splurge for this project was the fabric.  There are not a lot of fabric stores in Ottawa, let alone ones that sell quality vinyl.  I didn't want to go with just regular fabric as I was worried it would pucker once it was glued. I ended up finding some nice quilted looking vinyl.  When all was said and done, it cost about $56 for one yard.  Definitely more than I wanted to spend, but I realized I was going to have to if I wanted to achieve the look I was going for.  I measured and cut pieces for the front of all three drawers, the two sides of the frame, and the top.


I used some spray adhesive to glue the pieces down.  **Note: after about 24 hours the glue started to not adhere and the corners of the fabric were peeling off.  I recommend using a light coat of white glue instead of the spray.  I ended up having to go back and touch up the glue.


Then it was simply a matter of piercing through the vinyl to attach the new handles (I used a needle) and reinserting the drawers.  I wanted to purchase a piece of glass to put on the top to protect the fabric.  I shopped around for some quotes, and it was going to cost almost $80 to have a proper piece cut!  So not worth it!  I was palletizing a kitchen while working at Ikea the other day and noticed that the glass shelves we sell looked about the same size.  I purchased one of the Rationell 24x12" glass shelves and it fits!  It's a bit small, but I just centered it on the top and it looks fine.  And at $10 ($20 for 2) it was way better than getting glass custom cut!


I love it.  It finishes off the room really nicely.  I just have some accessories to tweak in the room and I think I can call the bedroom complete!  I'll add it to my house tour once it's done!

Tuesday, April 22, 2014

Classy Closet

I've been slowly plugging away at my bedroom...and I do mean slowly!  Last Christmas it was painted, then I purchased some new accessories in February.  Over March Break (wow that feels like a long time ago!) I painted my closet doors.  I LOVE how they turned out.

Here's a before of what the doors looked like.  Plain, builder white.  Don't mind the blue tape.  The photo was from back when I did my pre-delivery inspection.


Here's what they look like now!


All that is required for this project is some painter's tape, a pencil and ruler, and your wall paint colour. Super simple!

I measured 3 inches in from all my corners and made a mark on the door.  Sorry for the grainy, phone photos. I took them on a snowy, blizzard day in March so the lighting was pretty bad!


I made a few marks down the sides as well to line my tape up.  I pressed the tape down to make sure it was sealed REALLY well.


Then it was simply a matter of painting over the entire door, tape and all!  I did 2 coats on each door.


I was nervous when I peeled the tape off since I wasn't sure if the paint had bled through.  Luckily, it wasn't too bad.  The worst spots were the corners.  I took a small razor blade and lightly scraped off the paint splotches that seeped under the tape.  Lesson: make sure you press the corners down really firmly!  


The doors now blend really nicely with the wall and don't seem so huge.  The pattern is simple and very classy looking.  It really draws your eyes up and reinforces the high ceilings!  I LOVE them!!  If you are looking for an easy way to spice up your boring doors, this is the project to choose!


Sunday, March 16, 2014

Winners at Homesense!

Did you get that little title joke there?  Because they are both owned by the same company?  haha...okay...

I've been slowly plugging along working on my bedroom (really so far all that's done is the painting).  I have lots of inspiration pinned on Pinterest, and one thing I know for sure I want to do is get a bigger nightstand.  I currently have the same one that I used when I was a child and all it holds is a lamp and my alarm clock.  If I'm reading a book, it does not get a nice place on the nightstand, it has to go on the floor.  I wanted to update the nightstand (a project I'm currently working on!) and get a new, fancy lamp.  For Christmas, one of my tutoring students gave me a gift card to Winners. I went on a little shopping trip with my mom to see what we could find.

Let's just say it was one of those shopping days where you hit every deal and sale possible.  Don't you just love those days when they are unplanned?

I found a super, cool linen-covered box, with a lid and handles for $9.00 at Homesense.  I have been looking for a new box for AGES to replace a dirty, old white one I have from IKEA.  I love its faux wood look too, and at nine bucks I couldn't pass it up!


Then I found this awesome lamp in the lighting section.  But the shade had a dirty mark on it.  I considered trying to get a discount on the price (but it was already on clearance, probably because of the stain) and then cleaning it when I got home, but decided it wasn't worth the trouble.  There's a Winners store near my house, so we made a trip there to see if they had anything else, or even possibly the same lamp, since I really did love it.  By now I had decided I was going to use my giftcard for a new lamp.  Well, wouldn't you know Winners had the exact same lamp!  I was so excited!  But the shade was all dented in...boooo...nooooo.  I was bummed. The store manager happened to be within earshot and heard me lamenting the state of the shade and offered to let me swap lamp shades with any other lamp in the store.  After hemming and hawing, and walking away twice, I found one that I think works better than the original.  And that's how I walked home with this beauty! After my gift card, it only cost me $15.00!


Since my new lamp was going on my nightstand, my current bedside lamp was going to be moved to my dresser, since I have no overhead lighting in my bedroom.  So we made a quick dash into Bouclair to see if they had a lampshade I had seen on their website.  They didn't (bummer) but I did find another patterned one that was on sale.  What I didn't realize was that the store was closing (I'm so sad about this, and as I'm writing this now the store has officially closed) so I got 70% off the price.  I got the lampshade for $8.00. Can't beat that!  So my old lamp got a little eight dollar makeover.


I can't wait for the whole room to come together!  It's slow going, but maybe by the summer the reveal will be ready.  If summer EVER gets here! #sotiredofwinter